Filters
Create custom Ajax Load More filters in seconds
The Filters add-on provides front-end and admin functionality for creating, managing, and displaying Ajax Load More filters.

A no-coding required solution that makes filtering with Ajax Load More easy and intuitive for both developers and users.
Features
Some key features of the Filters add-on for Ajax Load More.
Facets
Filters (or facets) adjust dynamically on the fly based on previous filter selections.
URL Rewrites
Generate unique filter URLs with every query and allow visitors to share deep links to filtered content.
Filter Management
Easily build and manage filters using the Ajax Load More Filter Builder located inside your WordPress dashboard.
WooCommerce
Filter WooCommerce products by various criteria such as category, tag and price range.
Field Types
Add various form field types such as checkboxes, radios, selects and range sliders to your custom filter groups.
Search & Filter
Combine site search with taxonomy and meta queries to create a powerful search experience.
Google Analytics
Track visitor interaction and engagement by sending pageviews to your Google Analytics account.
Fwd & Back Buttons
Allow visitors to navigate between ajax loaded pages using their forward and back browser buttons.
Add-on Details
Learn more about the Filters add-on.
How It Works
The Filters add-on works by rendering Ajax filter controls (via shortcode) that target and hook into a single Ajax Load More instance. When a user interacts with a filter, the add-on generates a modified query object and passes the query to Ajax Load More for display.
Each time a filter is run, Ajax Load More generates a unique browser URL based on the selected filter parameters. Users are then able to share a direct URL to filtered content or use their forward and back buttons to browse previous filter states.
The Filters
On the back-end, Filters are created using the filter management tool which provides functionality for building and managing all the various filter combinations and options. The management tool allows you to select a query parameter, choose the form element style, and even chain filters together to create an advanced filtering form.
On the front end, a custom JavaScript module manages filter interactions, URL updates, and the passing of data to Ajax Load More.
TL;DR
It’s a tool for both the back-end and front-end of your website that allows you to create complex filter queries without writing a single line of code.
Examples
Basic Example
The example below demonstrates basic filtering using a category filter with a radio button field type. Notice that when a filter option is selected, both the browser URL and the Ajax Load More content update accordingly.
Filter by Category
- Announcement 9
- Open Source 1
- Release Notes 14
- Thoughts 2
- Tutorial 6
-

Data Prefetching with Ajax Load More
Improve the perceived loading times of Ajax Load More requests with the new prefetching feature.
-

More Examples
Advanced Filtering
Filtering posts by category, tag, and year using a variety of form element types.
Facet Filtering
Filters (or facets) dynamically adjust on the fly based on the user’s previous selections.
Checkbox Toggle
Add a select/unselect all option to a group of filter checkboxes.
Date Picker (Range)
Using a date picker to select a date range and return events active within the range.
Preselected Filters
Preselecting filter form values on initial page load.
Search
A simple blog search using the textfield field type and the Search query parameter.
Selected Filters
Displaying a stylized list of currently active filters.
WooCommerce Filtering
Filtering WooCommerce products by category, tag, or price range.
View the Implementation section below for information on how to build and load filters.
Implementation
Implementing Ajax Load More Filters is essentially a three-step process.
Step 1: Create Filter and Shortcode
Start by visiting Ajax Load More > Filters in your WordPress admin and create a new filter by entering a unique ID, selecting an interaction style, and building the filter blocks that will consist of your filters.
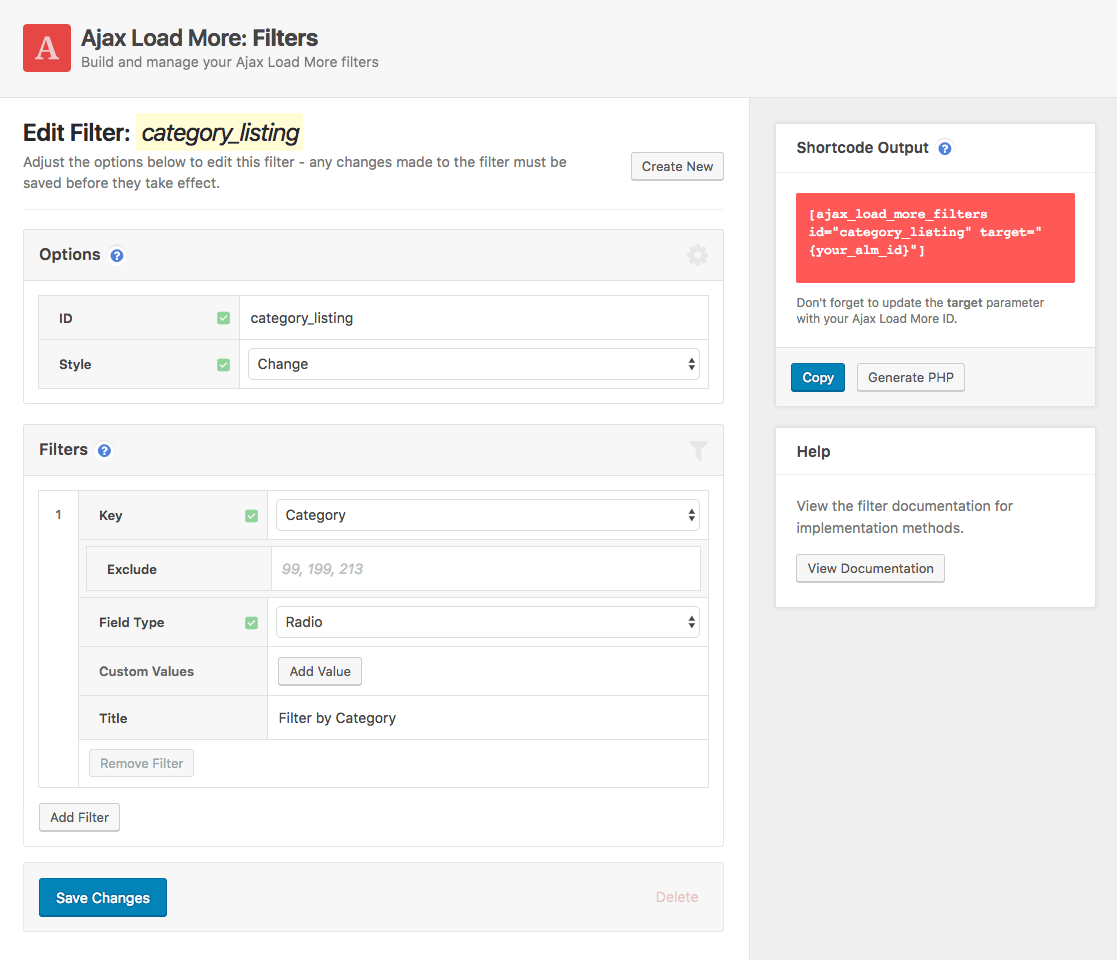
After a filter has been created and saved, the generated filter shortcode is ready to be added to a WordPress page or template for display – don’t worry if it’s not perfect, you can always go back and make edits/adjustments to the filter afterward.
Filters Shortcode[ajax_load_more_filters id="category_filters" target="my_alm_filters"]
The above shortcode can be added to your page in the location of your choosing.
Step 2: Create Ajax Load More Shortcode
The next step is to modify your existing Ajax Load More shortcode to allow for filters to be initiated on the Ajax Load More instance.
To do this, set filters=”true” and also set the target parameter as the filter ID. You will also want to double-check that the Ajax Load More ID matches the target parameter in the Filters shortcode (as seen above).
Ajax Load More Shortcode[ajax_load_more id="my_alm_filters" filters="true" target="category_filters"]
See the Shortcode Parameters section below for documentation on additional Filter parameters.
Step 3: Adding the Shortcodes
The final step is to add both the Filters and core Ajax Load More shortcodes to your page or template. For this example, the shortcodes have been added directly to a custom page template using the do_shortcode implementation method.
<?php
/**
 * Template Name: ALM Filter Template Example
 */
get_header();
?>
<div id="post-<?php the_ID(); ?>" <?php post_class(); ?>>
	<header class="header">
		<h1><?php the_title(); ?></h1>
	</header>
	<div class="main">
		<?php
		// Ajax Load More Shortcode
		echo do_shortcode( '[[ajax_load_more id="my_alm_filters" filters="true" target="category_filters" post_type="post"]]' );
		?>
	</div>
	<aside>
		<?php
		// Filters Shortcode
		echo do_shortcode( '[ajax_load_more_filters id="category_filters" target="my_alm_filters"]' );
		?>
	</aside>
</div>
<?php get_footer(); ?>Field Types
When building out a filter group you can select from 7 unique form element types for user input.
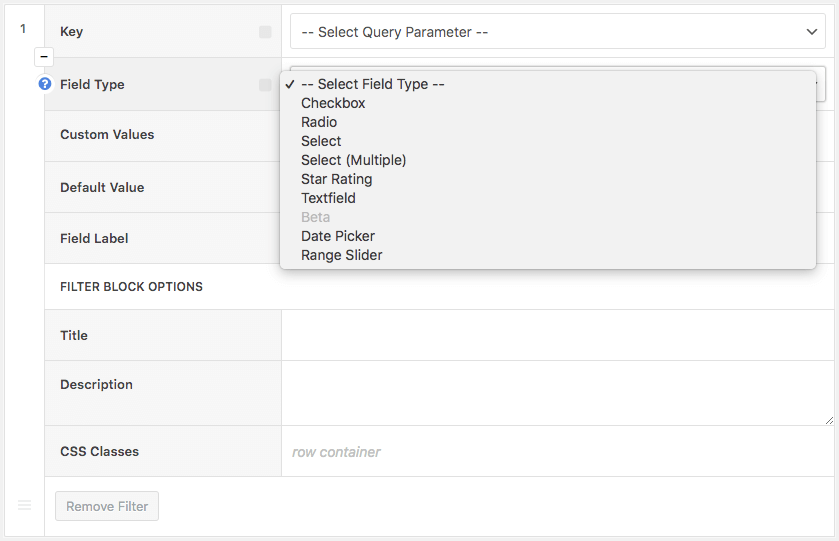
Each form element type displays and functions differently, choose wisely depending on the type of filtering required.
- Checkbox
The Checkbox field type allows users to select multiple values for a filter. - Radio
The Radio field type allows users to select a single value only for a filter. - Select
The Select field type displays a select box and allows for a single selection. - Star Rating
The Star Rating field type displays stars as a rating value and uses a Custom Field query for a numeric value. - Text Input
The Text Input field type displays a textfield input and a submit button (if selected). - Number Input
The Number Input field type displays a number input and a submit button (if selected). - Date Picker
The Date Picker field type uses FlatpickrJS to display a calendar and allows for a single, multiple, or date range selection. - Range Slider
The Range Slider field type uses the noUiSlider library to display a draggable range selector.
Filter Management
We’ve taken any guesswork out of creating filters by building an administration tool to help you create, modify, and manage filters. The tool allows you to build filter blocks based on preconfigured parameters leaving little room for error.
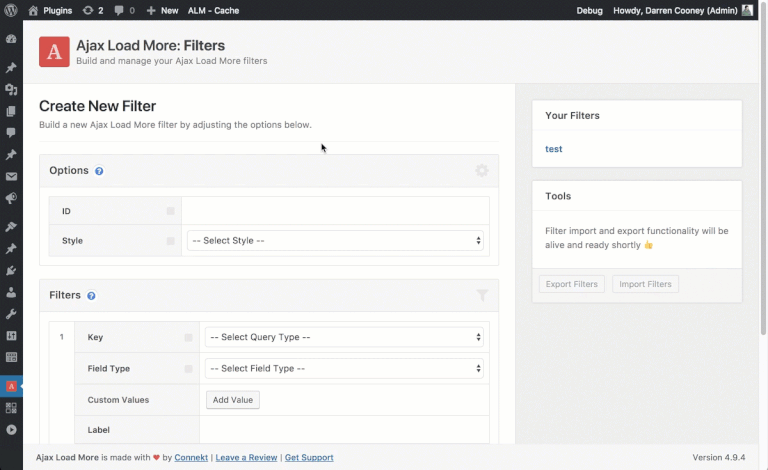
When a filter is created (or modified) the data is stored in the Options table of your WordPress database and then accessed on the front-end when filters are rendered for display.
Chaining Filters
One of the favorite features is the ability to chain filters together to create complex filter groups that can consist of many different query parameters.
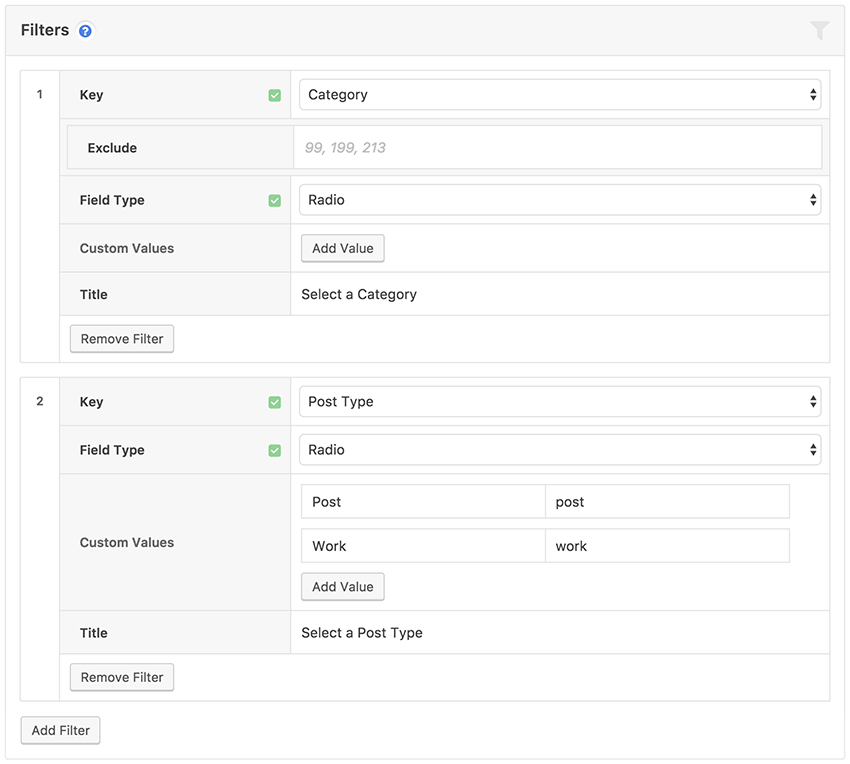
As seen in the screenshot above, it’s as easy as clicking buttons to add and remove filter blocks as your requirements change.
Shortcode Parameters
The following groups of shortcode parameters are available with the Filters add-on.
Note: The
core Ajax Load More shortcode and Filters shortcode have a target parameter required to
connect the filtering functionality.
Filters Shortcode
This shortcode accepts two required parameters: id and target.
| id | The ID of the filter set. required |
|---|---|
| target | The ID of the Ajax Load More instance.required |
| redirect | Redirect the user to a new URL after a filter action. e.g. https://website.com/results/ |
Example Shortcode[ajax_load_more_filters id="search_filters" target="alm_search_results"]
Ajax Load More Shortcode
The standard [ajax_load_more] shortcode has the following parameters to help set up and initiate a filter instance.
| target | The ID of the Ajax Load More Filters instance. |
|---|---|
| filters | Enable filters with this Ajax Load More instance. (true/false) |
| filters_url | Update the browser querystring with active filter values. Default = true |
| filters_paging | Add ‘?pg=x’ to the browser querystring as users load additional pages. Default = true |
| filters_scroll | Automatically scroll users to the top of the list after a filter update. Default = false |
| filters_scrolltop | The offset top position of the window is used with Paging Parameters and Scroll. Default = 30 |
| filters_analytics | Send pageviews to Google Analytics.(true/false) |
| filters_debug | Enable debugging of the Ajax Load More filter object in the browser console. (true/false) |
Example Shortcode[ajax_load_more id="alm_search_results" target="search_filters" filters="true"]
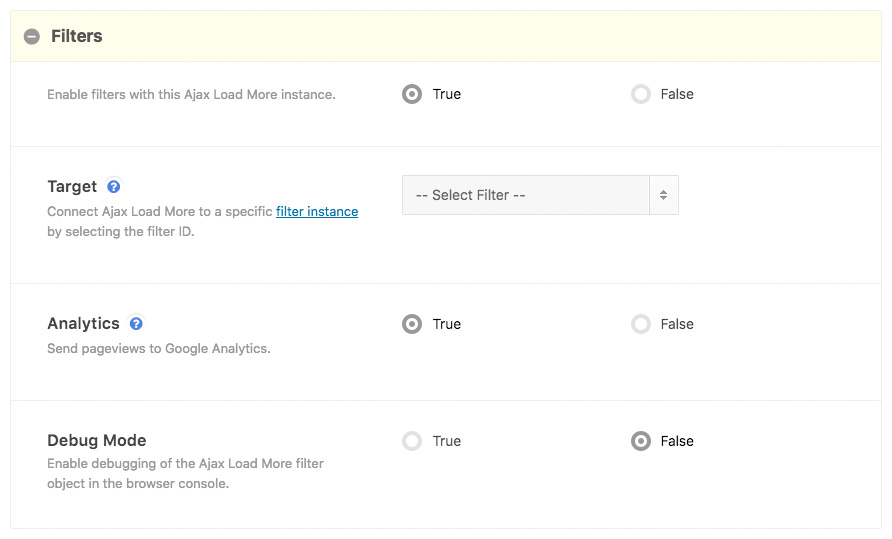
Shortcode Builder
Once installed, the Filters add-on provides the following options in the Ajax Load More Shortcode Builder.
Installation
Upon purchase of this add-on you will receive a confirmation/purchase receipt email. Your receipt will contain a direct link for downloading your copy of Ajax Load More: Filters and a license key.
After downloading the add-on, upload the unzipped files to your /wp-content/plugins/ directory or visit your plugins dashboard and upload the downloaded .zip under Add New.
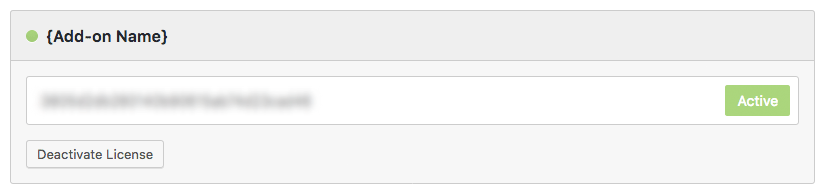
License Activation
To activate your add-on and receive updates directly in your WordPress plugins dashboard users are required to enter the license key that was included with their purchase receipt.
To activate a license key:
- Visit the Licenses section within the Ajax Load More plugin.
- Enter the product key and click Activate License.
- If the status indicator turns green your add-on has been successfully activated (example below).
If you did not receive a confirmation email containing your license key, please check your spam/junk folder. If you still cannot locate the email, contact me at darren [at] connekthq.com or use the Product Support form.