Next Page
Infinite scroll multi-page WordPress content with Ajax Load More
The Next Page add-on provides functionality for infinite scrolling multi-paged WordPress posts and pages.

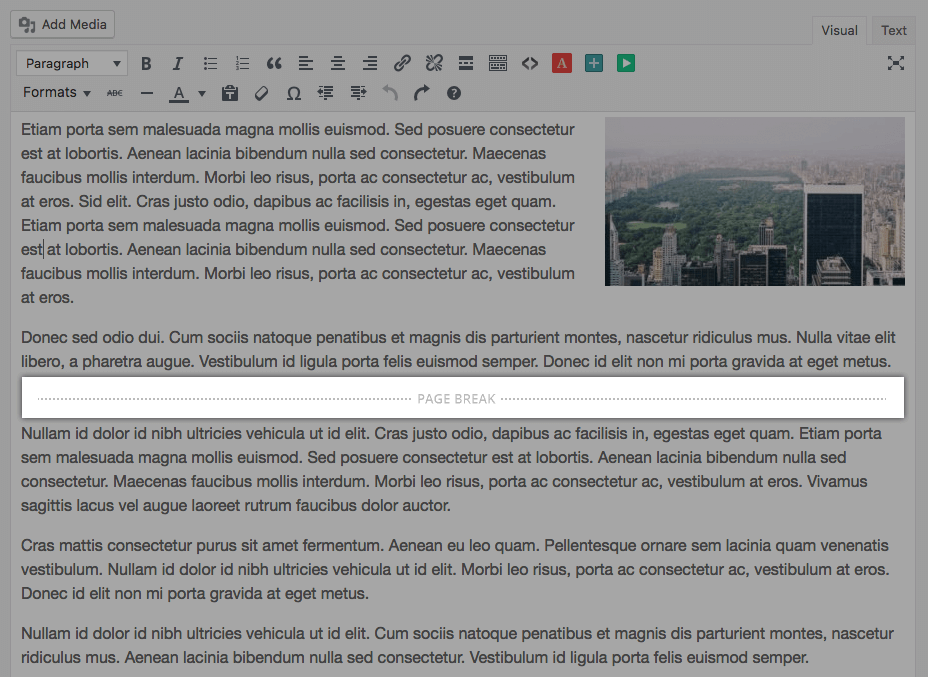
Load and display paginated WordPress content on demand with the Block Editor Page Break block or the <!–-nextpage–-> quicktag and Ajax Load More.
Features
Some key features of the Next Page add-on for Ajax Load More.
Increase Revenue
Grow your revenue by increasing your pageviews and ad impressions with paged content.
URL Rewrites
As visitors scroll your page, the browser address bar is updated to the URL of the page currently in view.
Paging Integration
Combine both the Paging and Next Page add-ons to transform your multi-page posts into slideshows.
Google Analytics
Track visitor interaction and engagement by sending pageviews to your Google Analytics account.
Add-on Details
Learn more about the Next Page add-on.
How It Works
The Next Page add-on uses the Page Break block for the WordPress Block Editor (Gutenberg) or the nextpage Quicktag in the Classic Editor to split the post_content of the current post into multiple pages.

The Next Page add-on dynamically splits the_content() of a page, post, or custom post type into unique pages at the location where Page Break blocks or nextpage tags are found, and then Ajax Load More provides functionality to infinite scroll the results.
Note: The nextpage tag and Page Break blocks are core WordPress functionality that dynamically split content into pages.
As users load additional pages of content, the browser address bar is updated to the page currently in view and pageviews are sent to Google Analytics for tracking – both these options can be turned on or off depending on your requirements.
With the Next Page add-on, you can infinite scroll any piece of post content your WordPress site offers.
Examples
Default
The default (out of the box) functionality of the add-on.
Top 10 List
Create a paged countdown for displaying a Top 10 listing article.
Auto Pagination
Automatically split content into pages without requiring quicktags or page break blocks.
Fullpage Content
Load an entire article with deep linking URLs into page-break sections.
Next Page & Paging
Create an intuitive slideshow for viewing multi-page posts with Next Page and Paging add-ons.
Single Posts
Integrate the Single Posts add-on with nested Next Page functionality to infinite scroll entire articles with pagination.
Post Preview
Display a post preview snippet with a ‘Continue Reading…’ action for the user to view the full article.
Implementation
Implementing the Next Page add-on is a two-step process of creating the multi-page content and configuring an Ajax Load More shortcode to display the results.
Note: Next Page add-on integrates with the standard WordPress content editor only. Content created via custom fields or rich text widgets cannot be used with this add-on.
Step 1 – Create Multi-Page Content
The first step is to create a page or post with some paginated content – if you’ve already done this, skip ahead to Step #2.
The Block Editor and the Classic Editor are both supported by the add-on, however, the implementation steps vary for each editor so please read below for instructions on how to create multi-page content.
Step 2 – Adding the Shortcode
The last step is to add or configure your custom Ajax Load More shortcode, the Next Page add-on provides two unique methods for doing so.
The Post Type implementation allows for Next Page functionality to be enabled automatically on specific post types. In contrast, the Template implementation allows for more granular control of where and when the functionality is enabled.
Shortcode Parameters
The following shortcode parameters are available with the Next Page add-on.
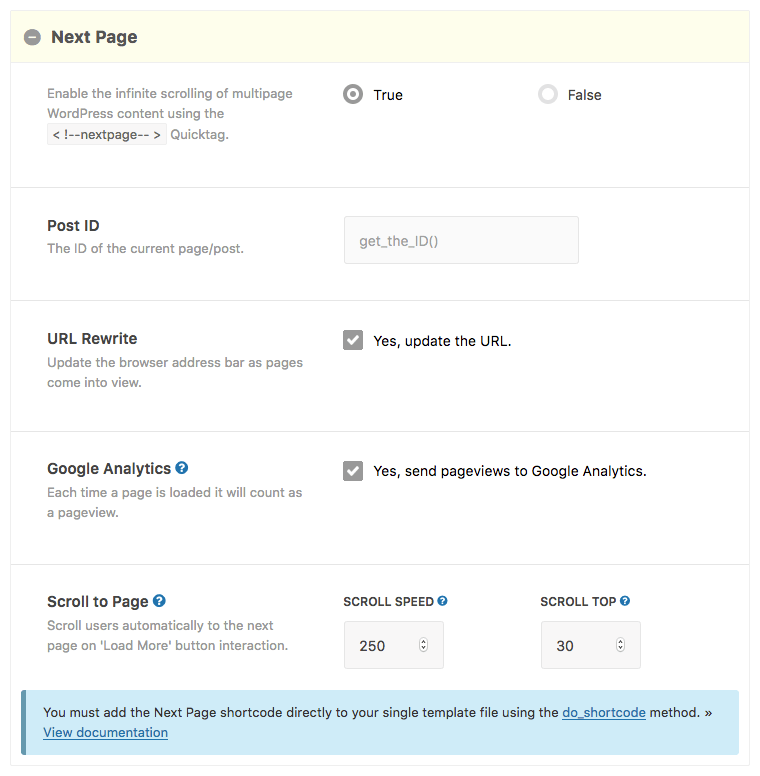
| nextpage | Enable the infinite scrolling of multi-page WordPress content (true/false). Default = ‘false’ |
|---|---|
| next_post_id | The ID of the current page/post. |
| nextpage_type | Select the Next Page loading type (paged/fullpage). Default = ‘paged’ |
| nextpage_urls | Update the browser address bar as pages come into view (true/false). Default = ‘true’ |
| nextpage_pageviews | Send pageviews to Google Analytics. (true/false). Default = ‘true’ |
| nextpage_scroll | Scroll users automatically to the next page (true/false:scrolltop). Default = ‘true:30’ |
| nextpage_title_template | The title template is used to update the browser title each time a new page is loaded. |
Shortcode Builder
The following screenshot illustrates the process of building a Next Page shortcode using the Shortcode Builder.

Example Shortcode
[ajax_load_more nextpage="true" nextpage_urls="true" nextpage_scroll="true:50" nextpage_post_id="'.get_the_id().'"

pause="true" pause_override="true" scroll="false"]
Note: When using the Template Implementation, the Next Page shortcodes must be added using the do_shortcode method of shortcode implementation.
Installation
Upon purchase of this add-on you will receive a confirmation/purchase receipt email. Your receipt will contain a direct link for downloading your copy of Ajax Load More: Next Page and a license key.
After downloading the add-on, upload the unzipped files to your /wp-content/plugins/ directory or visit your plugins dashboard and upload the downloaded .zip under Add New.
License Activation
To activate your add-on and receive updates directly in your WordPress plugins dashboard users are required to enter the license key that was included with their purchase receipt.
To activate a license key:
- Visit the Licenses section within the Ajax Load More plugin.
- Enter the product key and click Activate License.
- If the status indicator turns green your add-on has been successfully activated (example below).

If you did not receive a confirmation email containing your license key, please check your spam/junk folder. If you still cannot locate the email, contact me at darren [at] connekthq.com or use the Product Support form.


